
General Campaign Settings
Start a new campaign by first configuring basic campaign settings. These are the same for all email campaign types, with the slight difference that time period in abandoned cart email is minutes whereas in other campaign types it is days.
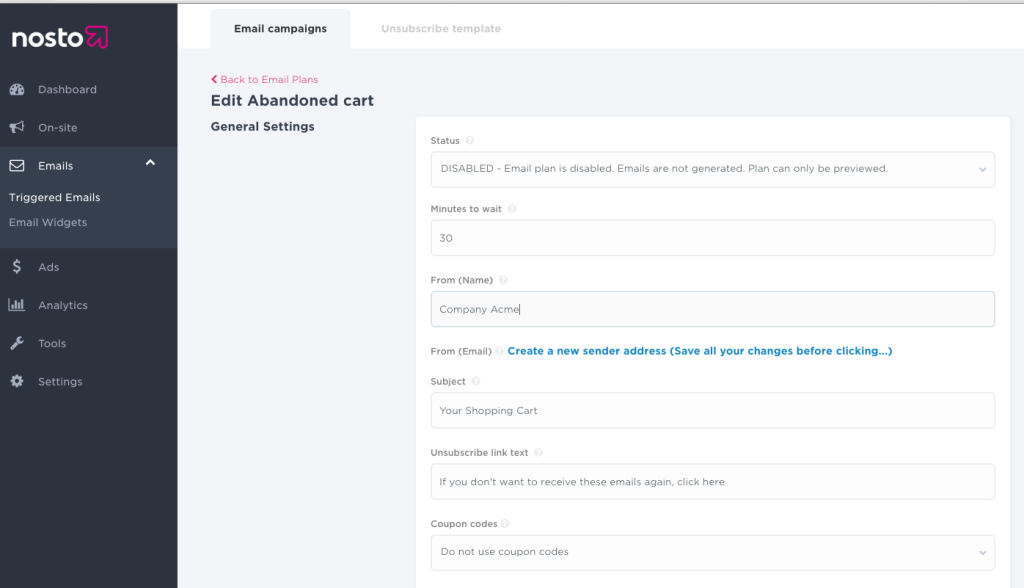
Status is essentially the switch on / pause / off switch for email campaigns. When status is Disabled the feature is fully inactive. In Test mode, emails are generated and these are available for preview under browse Emails. Active is self-explanatory: Emails are generated and sent if sender address is verified and set accordingly.
Minutes / days to wait is the time period Nosto waits until an email is sent. Time period is tied to customer’s activity and to email type. In the example above, Nosto waits 30 minutes after customer has left the site before sending an abandon cart email.
From (Name) is sender’s name visible in email client’s preview. If left empty, email-address defined in From (email) is used instead.
From (Email) Applicable email addresses for a sender as a dropdown menu. In the example above, sender has not yet been verified. Adding a new address requires an e-mail address verification, which is executed under sender addresses.
Subject is the subject field for email in preview. Pay special attention to a proper subject header, since it has a significant impact to email’s open rate (how many customers open the email)
Unsubscribe link text: Text for the unsubscribe link positioned at the bottom of the email.
Coupon codes are the available coupon code pools as a dropdown menu. Using coupon code is optional addition to emails. In the example above, coupons have not been added. Learn how to add coupons here.
Email Content: Intro Area
On top of the email, before product recommendation area, is the email’s introduction area managed with editor tools. The easiest way to adjust is to adjust and preview how the changes have been applied by using preview tool at the bottom of the tools section.
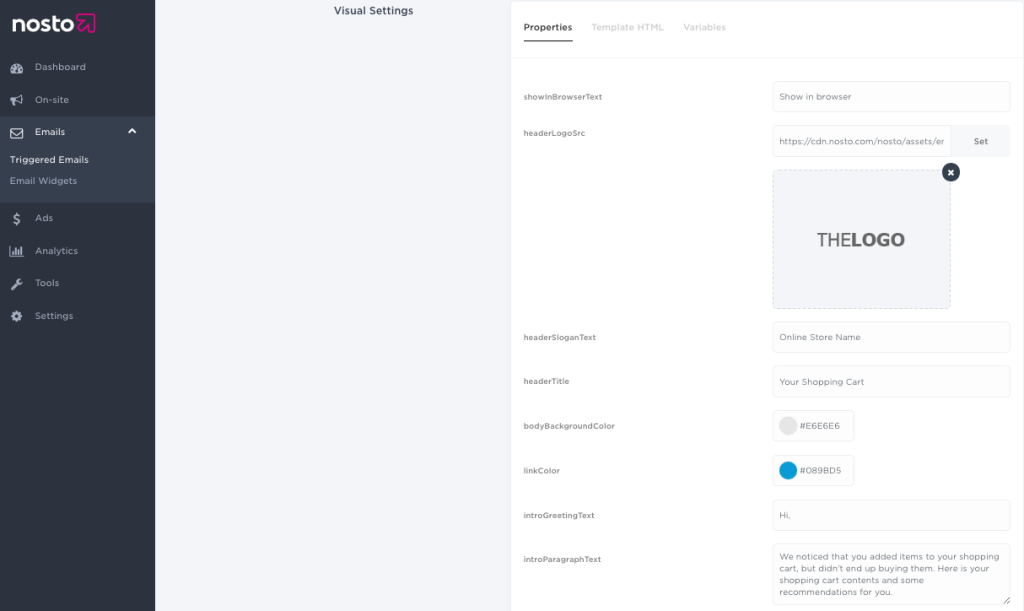
Showinbrowser is the text of a link that opens up the email in a browser
HeaderLogoSrc is the url to company’s visible in the top left corner of the email. Use the url field if you want to host and load the logo from your own CDN or image gallery or upload a logo by dragging a file to the reserved field
HeaderSloganText is the company’s slogan visible under the logo. Leave empty if slogan is not wanted.
HeaderTitle is the visible email title in the top right corner
BodyBackgroundColor is body’s background colour
LinkColor is the colour of a link-text in the email
introGreetingText is the personal greeting before customer’s first name. If first name is missing, most likely this has not been mapped accordingly in the implementation
introParagraphText is the main copy-text content of the email. In brief, it should communicate and repeat again, who sent the email, why the email was sent and what the customer should do next i.e. communicate call to action.
Email Content: Recommendations Area
Below intro is the actual content: product recommendation area. Products and context such as name, price and description are populated into the email automatically, but copy-text area and titles are customisable using the editor tools. Compare editor and an example email below.
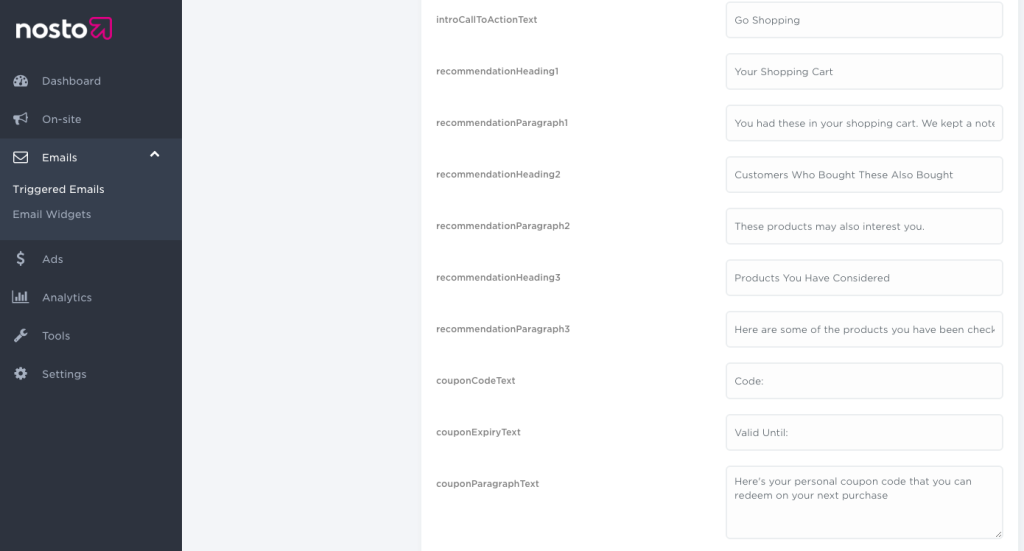
introCallToAction is the CallToAction-link below the paragraph area.
recommendationHeading1: Descriptive title of the first recommendation
recommendationParagraph1:Descriptive header for subheader/paragraph below recommendation header. Leave empty if not needed.
recommendationHeading2: Descriptive title of the second recommendation
recommendationParagraph2: Descriptive header as above.
recommendationHeading3:Descriptive title of the third recommendation
recommendationParagraph3: Descriptive header as above.
Email Content: Coupon Area
After coupon pool(s) is successfully created this can be attached to any email campaign by selecting the preferred campaign from dropdown menu.
After activation and if an email campaign uses coupon codes, an additional coupon area is automatically added to the email below intro-text area. Text areas are editable intro texts for coupons. Coupon and expiry date are automatically populated to the email from the coupon pool. In case a coupon pool depletes or expires, coupon features are automatically removed from the email.
CouponCodeText is the text before the actual code
CouponExpiryDate is the date of expiry as set under coupon code management
CouponParagraphText is the text visible in the email.